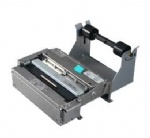
UTP-80FK
Thermal Printer UTP-80FK
1. Printer usage cautions
• Do not disassemble or attempt to repair the printer.
• Do not allow water to enter the printer.
• Do not drop or jar the printer.
• Fix a paper jam after turning off the power.
• Turn off the power when there is some problem (for example, strange smell or smoke), and
confirm that the trouble is not continuous.
2. Paper usage cautions
The surface of the thermal paper is coated with special chemicals and the characters are
printed out by thermochemical reaction.
• Use specified thermal roll paper.
• Keep in a cool, dry place.
• Keep paper away from hard objects, solvents and vinyl film to prevent paper discoloration.
• Use water-based glue (starch glue, synthetic glue, etc.) when pasting thermal paper.
• Adhesive tape can discolor the thermal paper. Use double-sided tape on the reverse side of
the paper.
• Do not touch the paper with wet hands. Fingerprints may appear on the recording or the
recording may become blurred.
3. Specifications, Parts of the Printer
Specifications
1. Thermal roll paper
Paper type: P-80-25 (Code NO. 000-805-780)
Width of paper: 80 mm
External diameter of roll paper: φ48mm
Length of paper: 25m
2. Environmental conditions
Useable temperature: 0 to +50°C
Storage temperature: -20 to +60°C
Useable and storage humidity: 35 to 85% (no condensation)
APPENDIX
AP-20
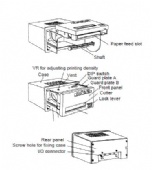
Parts
Paper feed slot
Shaft
VR for adjusting printing density
Case Vent DIP switch
Guard plate A
Front panel
Guard plate B
Cutter
Lock lever
Rear panel
Screw hole for fixing case
I/O connector
4. Operation
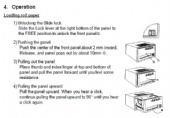
Loading roll paper
1) Unlocking the Slide lock
Slide the Lock lever at the right bottom of the panel to
the FREE position to unlock the front panel1.
2) Pushing the panel
Push the center of the front panel about 2 mm inward.
Release, and panel pops out by about 10mm 2.
3) Pulling out the panel
Place thumb and index finger at top and bottom of
panel and pull the panel forward until you feel some
resistance.
4) Pulling the panel upward
Pull the panel upward. When you hear a click,
continue pulling the panel upward to 90° until you hear
a click again.
APPENDIX
AP-21
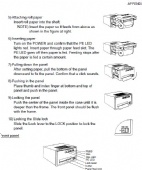
5) Attaching roll paper
Insert roll paper into the shaft.
NOTE) Insert the paper so it feeds from above as
shown in the figure at right.
6) Inserting paper
Turn on the POWER and confirm that the PE LED
lights red. Insert paper through paper feed slot. The
PE LED goes off then paper is fed. Feeding stops after
the paper is fed a certain amount.
7) Pulling down the panel
After setting paper, pull the bottom of the panel
downward to fix the panel. Confirm that a click sounds.
8) Pushing in the panel
Place thumb and index finger at bottom and top of
panel and push in the panel.
9) Locking the panel
Push the center of the panel inside the case until it is
deeper than the frame. The front panel should be flush
with the frame.
10) Locking the Slide lock
Slide the Lock lever to the LOCK position to lock the
panel.
Front panel
FEED
SEL
SEL LED
PE LED
Lock lever
Cutter
Paper feed slot
• PE LED: Lights when paper is out.
• SEL LED: Lights in ON-LINE condition.
Data can be received when the light is ON.
• SEL: Chooses ON-LINE or OFF-LINE, alternately.
To temporarily stop printing use this switch to choose OFF-LINE
(SEL LED goes OFF). Push the switch again to re-start printing.
FEED is available on OFF-LINE.
• FEED: Feeds out paper continuously when equipment is in OFF-LINE
condition.
This switch also executes the |


